General Information on the Carcano
Quality of the Carcano
There have been various disparaging remarks made about the Carcano which
- over the time - have tainted its reputation. Most of these remarks are
hearsay rumors which one firearms writer has copied from the other, as
so frequently happens. The most damaging is probably the story about
a WW II Allied soldier getting killed when firing a Carcano, thus giving
the Carcano the reputation of being unsafe.
The story goes that the firing pin ruptured the primer causing the
expanding gases to propel the firing pin backwards, breaking the safety
retaining pin and into the face of the unfortunate soldier. The only
problem about this story is that no one seems to know the name of the
soldier, the nearer circumstances of the incident, or any other provable
fact. Since then, there have been no other reports of injuries even
remotely similar to this incident, thus either suggesting the incident
was a fluke or, more likely, false wartime rumor.
The second is the "humanitarian rifle" moniker used a couple of times in
the Warren Commission Report. This
rumor apparently has it roots in the false belief that the Carcano is so
poorly made that it will either not fire, or is so inaccurate that when
actually fired, you'll probably miss the target (the opposing soldier
that is), or that the terminal performance if its 6,5 mm bullet is so
insufficient.
Thus it would be cosidered "humane" to the enemy. Actually, this quotation
seems to go back to an (in)famous Mussolini speech of early 1943 date in
which he tried (with his usual flamboyant rhetorics) to veil the
complete failure of Italian military leadership - notably his own - by
blaming e.g. equipment.
Neither is the Carcano unsafe, nor is it inherently inaccurate:
According to Bloomgarden, on the
sporting (competitive) use of the Model 91:
"[The Royal Arms Works in Terni] might still take pride [sc.
in the mid-1960s]: in an experiment a Model 91 of her own, with sight
modified to make it correspondent with a modern Garand rifle manufactured
by Beretta, displayed a greater accuracy than the Garand." (p. 127)
"The president of Interarms, the largest private wholesaler of ammunition
and armaments [stated]: 'It's interesting to note that the Italian army
NATO rifle team still uses the 6.5-mm M91 rifle in the NATO matches and
still comes out in the top positions, it advises us, every year, against
all other NATO teams with all the other rifle types. It uses their own
original 6.5-mm cartridges which are, now, at least ten years old
minimum.'" (p. 133)
According to Hobbs:
"Several years ago the Editor of Banzai called me
about the Type I, it seems at the annual Alabama Shoot Out they had shot
the Type I for the first time and were surprised to find it was more
accurate than the Arisakas."
Acording to a kind notice from John Stovall:
From: John.A.Stovall@cdc.com (John A. Stovall)
Newsgroups: rec.guns
Subject: Re: Kennedy Assassination Rifle
Followup-To: talk.politics.guns
Date: 5 Jul 1998 19:03:28 -0400
Message-ID: <6np0o0$mhp@xring.cs.umd.edu>
References: <6nlfoh$fa5@xring.cs.umd.edu> <6nop19$l7e@xring.cs.umd.edu>
...
You haven't read much about the M91 Carcano then. I suggest you read,
"Testing the Weapons of War" by Timothy J.
Mullin. Mullin fired over
a hundred different military weapons of this century and a few of the
last. And guess what, it ended up in the five best rifles he tested.
"The M91 Italian Carcano carbine with fixed sights was the most
surprising of the weapons fired. I had always thought of them these
rifles as cheap wartime emergency weapons, but instead they are light,
handy, and easy to shoot with great combat sights. It is he best
rifle fielded by the Italians during the war and much better than any
other bolt action rifle used in the two world wars by the combatants -
except as noted earlier with the Pattern 14/m1917 Enfield"
The Gun Itself
Exploded diagram of Carcano Modello 1938 Action
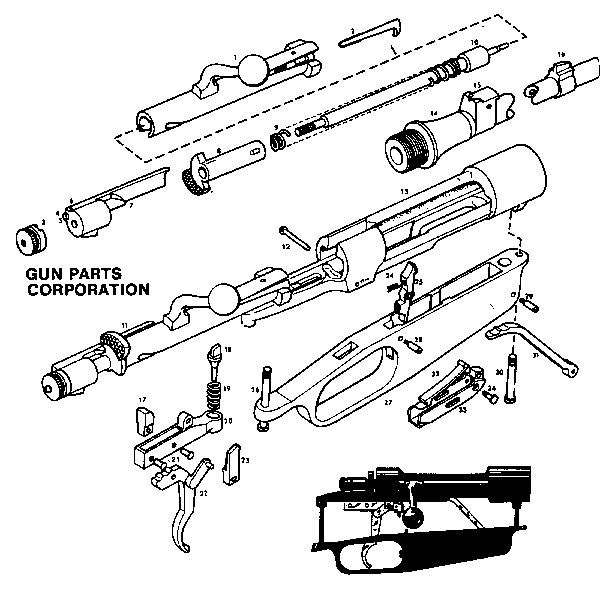
Image from: The World Guide to Guns Parts,
Volume 18, 1994, p. 175, Gun Parts Corp. |
| No. | Part Name | No. | Part Name |
|---|
| 1 | Bolt - Stripped
w/Straight Handle (m91)
w/Bent Handle (m38) | 2 | Extractor |
| 3 | Cocking Piece Nut | 4 | Cocking Piece Nut Retainer |
| 5 | Retainer Spring | 6 | Retainer Pin |
| 7 | Cocking Piece | 8 | Safety |
| 9 | Firing Pin Spring | 10 | Firing Pin |
| 11 | Bolt - Complete (Parts 1-10) | 12 | Sear Pin |
| 13 | Receiver | 14 | Barrel |
| 15 | Adjustable Rear Sight (m91)
Fixed Rear Sight (m38) | 16 | Front Sight |
| 17 | Sear Stud | 18 | Ejector |
| 19 | Sear Spring | 20 | Sear Bar |
| 21 | Trigger Stud Pins (2 Required) | 22 | Trigger |
| 23 | Boltstop | 24 | Clip Latch Spring |
| 25 | Clip Latch | 26 | Rear Guard Screw |
| 27 | Trigger Guard | 28 | Clip Latch Screw |
| 29 | Housing Retainer Screw | 30 | Front Guard Screw |
| 31 | Follower | 32 | Follower Spring |
| 33 | Follower Housing | 34 | Follower Hinge Pin |
| The following parts are not illustrated |
| Stock | | Handguard |
| Buttplate (m91)
Buttplate w/Trapdoor (m38) | | Buttplate Screws (2 Required) |
| Rear Swivel w/2 Screws(m91)
Sling Bar w/2 Screws (m38) | | Rear Band (Front Swivel)
w/Spring Lock (m91)
w/1 Screw & Swivel (m38) |
| Front Band
w/Integral Bayonet Mount (m91)
w/Barrel Bayonet Mount (m38) | | Front Band Screw
(1 Required m91)
(2 Required m38) |
| 3 Piece Cleaning Rod (m38) | | 6 Round Clip |
Instructions for disassembly for Modello 38 (Modello 91 similar)
- Open bolt and pull back to stop. Press trigger and pull back on bolt to remove.
- Remove front and rear guard screws. Pull down on trigger guard to remove.
- Remove screws for front band and rear band.
- Slide rear band and handguard forward (up to front band).
- Pull receiver from up from stock (approx. 2cm). Barrel will pivot and slide around stock at front band. Slide receiver/barrel forward a few centimeters.
- Remove front band by pushing forward on band. Front band, rear band, handgurard and barrel/receiver will come off stock as a 'unit'. Bands and handguards can now be slipped off of barrel.
- Pull sear pin out from receiver. Sear and associated pieces can be removed and disassembled.
- Remove follower housing retaining screw.
- Push follower housing through the hole located behind the front guard screw hole on top of housing, then pull housing forward to free from guard.
- Compress the follower and insert a thin bladed screwdriver through the front of the slot in the side of the housing.
- Release the follower and pull the follower hinge pin out. Follower can be removed.
- Slide the screwdriver towards the rear of slot and gently remove the screwdriver. Be careful, the follower spring is under compression until the screwdriver is fully removed.
- The follower spring can now be removed by pulling up to about 90° and then pulling it out.
- Remove clip latch screw and remove clip retaining latch and spring. Please note that this part is also under spring compression.
- Grab bolt body and rotate cocking piece counter-clockwise (facing in direction of cartridge loading motion). You may need to pull back on cocking piece to start the rotation. This will release spring tension from cocking piece. Depress cocking screw r
etaining pin and unscrew cocking piece retaining nut. Pull cocking piece off firing pin. Notice alignment marks on firing pin, safety and how cocking piece must align with these two pieces when reassembled.
- Press safety and rotate counter-clockwise and release pressure until it stops. Now, very carefully as the firing pin spring is still under compression, depress safety about 5mm and rotate counter-clockwise again until it stops and release pressure. T
he firing pin can now be removed from the bolt body.
- If you wish to remove the extractor (not recommended, except for unusual situations), with small pliers (needle nose), grab extractor claw and pull out (radially) and forward.
- At this point, the gun has been stripped to about a far as it can go. Reassembly is the reverse of the above.